See Everything

See Everything

Tuesday, January 13, 2015


Itsy Bitsy Teeny Tiny Pantry


Now don't get me wrong, I LOVE my new house but it has its "needs".  The main thing beyond the usual and customary is the pantry. The pantry is TINY and I mean tiny. Well tiny with huge shelves.  You know, the metal kind that stuff doesn't ever sit right on and big enough that you can't see what's in the back. 
BEFORE

The worst part is - not everything fit, so I was using valuable cabinet space for food storage. Not. Good.  On to the solution!
                     
                     Materials Needed:
  • ShelfTrack Brackets - Double or Single track per preference (I used single for this project) $15/track
  • Brackets - Double or Single per track requirements & as many as needed for number of shelves & desired depth (I wanted versatility, so I purchased enough for 12 shelves with a 10 inch depth) $2.50/bracket
  • Shelves (I purchased 10 inch deep shelves long enough to cut to size) $10/shelf - because I cut them, end result was $2.50 per shelf)
  • Spice rack $20
Materials

We started with removing the existing shelving and hardware. Patched the holes and painted the interior.
Then we installed the tracks.  Important note: Be sure to get heavy duty anchors, the shelves will be holding a LOT of weight.  We went with 70# anchors on the top, 50# anchors in the middle and 30# anchors at the bottom. Here's what it looked like at that point:

We then cut the shelves to size. The back width of my pantry is only about 30 inches, so I purchased 72 inch length shelves to get more for my money. As I mentioned, I was going for versatility, so once we had the right length (covering the back wall width), we cut all but 2 shelves in half.

Once all the shelves were cut and placed side by side, it looked like this:
 

NOW I had something to work with!! Notice the slices down the center of the shelves. That was so I could end up with THIS:
  
AFTER - AMAZING!!!
Authors Note: "We" in every project refers mostly to Ivan, who has been my steady assistant through these projects. My design, his work. And NO project would be complete without the awesomeness that is Brittani, to whom ALL organization of the finished project credit goes to. Thank you both so much!

Now, let's take care of that disgusting wall color shall we???


Friday, December 19, 2014


The Laundry Center


Laundry. Ugh. Kind of everyone's thought, right? In reality though, laundry equals job security. Just a thought.

New house, new things, right? Indeed! Since we all can't walk around in dirty clothes all the time, the laundry room was one of my first projects. (Okay, I changed the locks and painted the front door first, but the laundry room was next).

First on the list was a new washer & dryer. I went with the Whirlpool Duet set from Lowes since I had a 10% off coupon in my moving packet from USPS.

I'm short, but still had to bend/squat quite a bit with my old front-load set (which was on a standard pedestal), so after much looking (well notsomuch) I decided I wanted this (which I found on Pinterest)
The Inspiration:

http://ashleemarie.com/new-laundry-room-and-shelf/

I drew out a plan and headed to the tore for materials. We ended up with:
                   A few 2x4's (we got long ones and had the store cut some of them to the sizes we needed)
                   A sturdy plywood board
                   A box of wood screws (long enough to get through the plywood/2x4's)

We needed some of the 2x4's for legs and some for the plywood base. We started off with aligning the legs under the base and screwed the base 2x4's into the wall studs. We slid the legs under and attached them to the base.


Before adding the plywood to the top, we put another 2x4 through the center for stability

Attaching the plywood to the 2x4's was the easy part. 
 

We hoisted the washer & dryer onto the plywood and VOILA...


 Since the dryer vent in the house is on the left (and front loaders need to be positioned with the dryer on the right), I needed to figure out how to get the dryer vent hose from the dryer to the vent.When we were building the pedestal, we made a cut-out in the plywood to feed the vent hose from the dryer to the outside vent going under the pedestal itself.

It is the PERFECT height and I can get those old-fashioned laundry baskets (you know the smaller grungy cheap ones you can get at the dollar store) in the cubbies underneath and my detergents/fabric softeners/garbage can in between. I'm in love with my laundry room!

(Much thanks to Ivan for his building and lifting assistance)


Thursday, December 11, 2014

New House - New Stuff

Perhaps due to my knee/leg injury, I decided I needed to move. Perhaps it was my parents getting older. Or maybe it was my youngest son (who had recently moved to TN with me) and his desire to return 'home' to IL. Whatever it was, I cashed in my chips and called it a day.

Moving back to IL has had it's bumps. It's cold. Very cold. There's snow that actually needs to be removed. In TN, it would snow...and it was beautiful! It was also gone by mid-afternoon, so I did not have a need for a shovel or salt or a snow blower. But this is IL. When it snows - it snows!  A trip to the store for a shovel or 2, a snow blower, salt, a receptacle to house the salt, ice scrapers for the vehicles, snow boots, hats, gloves, scarves, thick coats...Pretty sure the cashier must have thought we moved from Hawaii.

More importantly, I BOUGHT A HOUSE! My first house on my own!! A foreclosure with a bit of make-up needed. The first of which was a good cleaning, followed closely by ripping out the carpeting. Since those are tiny things compared to what's ahead, I'm just going to bypass those and start with the good stuff. 

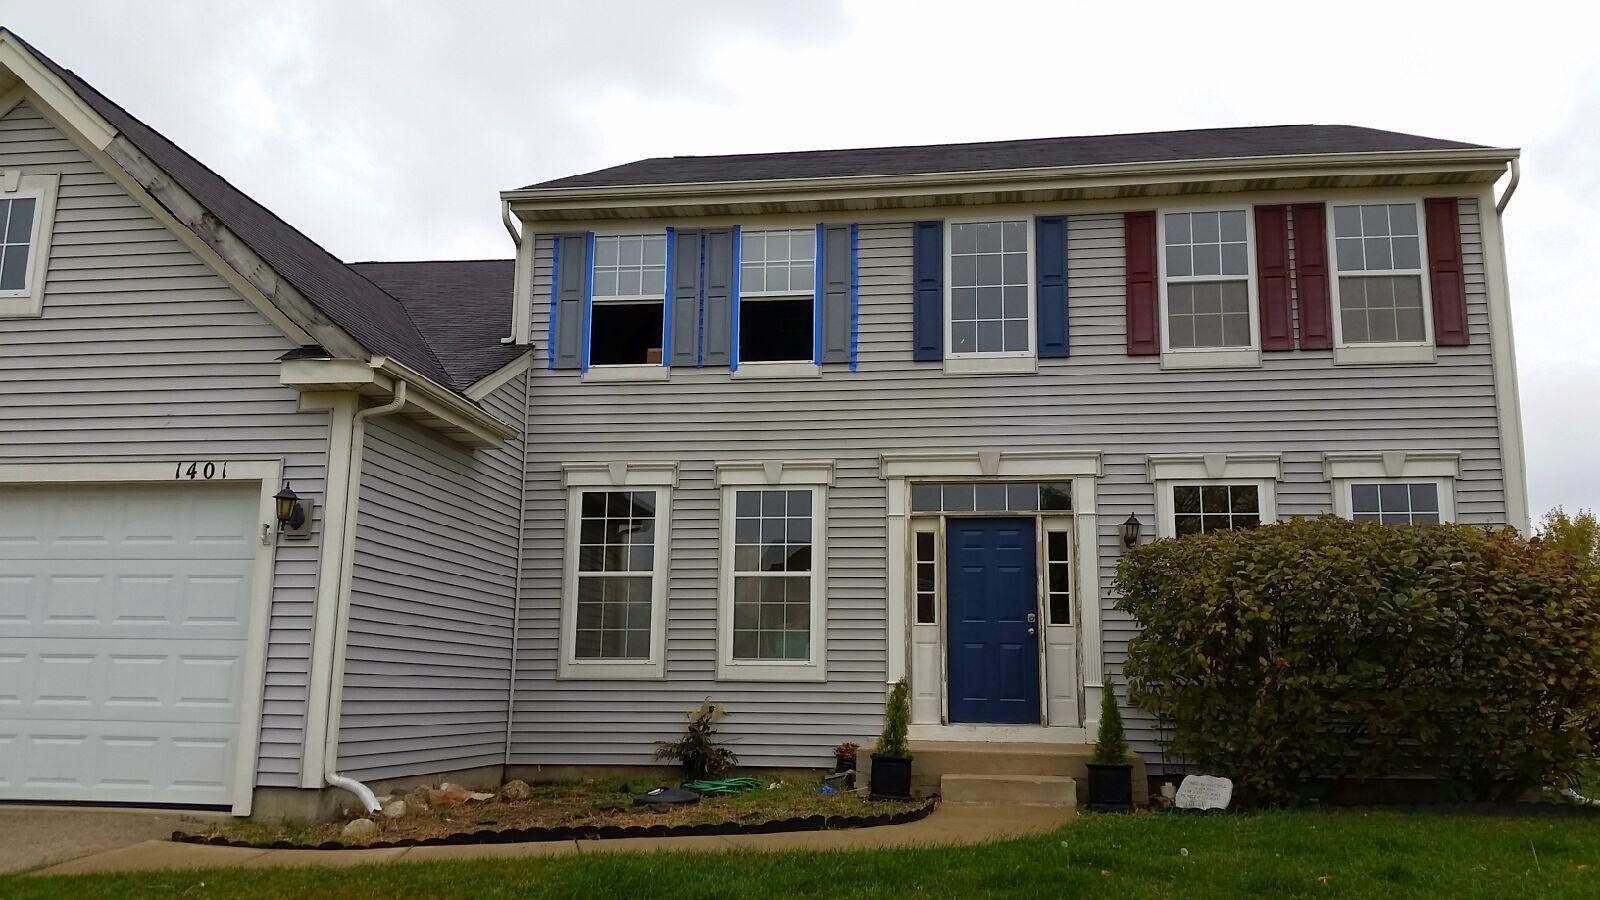
My first thought looking at the exterior of the home was HATING the ugly, faded reddish color of the front door and shutters:

I started with the front door because I could accomplish that myself.  I chose this gorgeous blue:
 

The shutters were a whole other story. How in the hell could I get those the same amazing color as my new front door??? I first looked into replacing them. FAR too much $$$. Prime & paint it is! I enlisted the assistance of my youngest daughter's boyfriend (who is rapidly becoming a member of the family). Here's the transition:
Before

The prime & paint begins

Still priming & painting...


The finished gorgeous!!
(Next up in the spring-cleaning the siding...)

So begins the next blogging adventure...I believe this falls under "Start Anew" (see previous blog)


Thursday, November 13, 2014

Begin Again or Start Anew

Whatever you want to call it, here I am!

Quick catch up:
  •  I still haven't finished "The Chair"
  • I fractured my kneecap Sept. 2013
  • Treatment for said fracture caused muscle weakness & nerve damage to my lower leg
  • Said muscle weakness caused a meniscus tear
  • Surgery for meniscus tear April 2014
  • Taken off employee roster (due to extended medical leave) May 2014
  • NEW PLAN
  • Bought a house in northern IL (it's a bit of a fixer-mostly decorative)
  • JUST went "under contract" for house in TN
  • Taking my LAST nursing course before the assessment period begins
  • Helping my oldest daughter plan her wedding
  • EXPECTING GRANDBABY #2 in March 2015 :)
  • OMG...Garth is back!!!!!!!!!!!!!!!
  • Speaking of Garth...Adam's stone is finished. I hate that it is what it is and where it is but IT'S PERFECT! (Thank you http://www.westmemorials.com)
     
  • My youngest daughter's boyfriend and I built a pedestal for my new laundry center (watch for tutorial post on that project coming soon!)
I think that's it. I may or may not be starting a new blog on a few things medical...